Quick Start: Configuring the Kaseya Extension
This Quick Start contains step-by-step instructions and Best Practice recommendations.
Step 1: Have Datto enable the Managed Services Extension
Go to Left Navigation Menu > Admin > Admin Categories > Extensions & Integrations > Remote Monitoring / Management Extensions. If the Kaseya Extension is not enabled (grayed out), submit a Kaseya Helpdesk request to have the extension enabled.
Step 2: Enable the API in Kaseya
- Open Kaseya.
- To ensure that the API is turned on:
- Click the down arrow in the left pane, then choose System.
- Under Server Management, click Configure.
- Locate the Enable VSA API Web Service check box. If it is clear, click to select.
- If possible, set up a new Kaseya Admin user to use with the Autotask Kaseya Extension. This will remove any possibility of filtering out devices to be discovered.
- Turn off Independent Ticket Sequence Numbering. In order to have the ticket number match with the "ticketreferencing" number in the URL, go to Ticketing > Email Reader and check the Turn off independent ticket sequence numbering (use identity value) box. This check box is not available on multi-tenant systems.
Step 3: Configure the Kaseya Extension in Autotask
In Autotask, go to Left Navigation Menu > Admin > Admin Categories > Extensions & Integrations > Remote Monitoring / Management Extensions > Kaseya.
On the Device Discovery tab:
- Select the Active check box.
- In the Adapter Web Services Area, change the URL to reflect YOUR Kaseya instance, and enter the Username and Password you created in Step 2. Click OK to save your settings.
To set the schedule for automatic discovery, select 1 or 2 days a week (recommended: Sunday and Wednesday). Select a time (recommended: 12:00 AM).
- Enable the following Advanced Configuration Options:
- Automatically create products
- Hide Updates
- Default Warranty expiration (365 days)
- Do not generate email notification unless new or updated...
On the Options tab:
- Enable Round Trip Ticket Closure should be selected.
On the Notifications tab:
- Select one or more resources to receive notification emails when device Discovery has completed or when an error has occurred.
- Click Save when all of the options in steps 1-5 are set.
Step 4: Run Device Discovery
- Return to the Device Discovery tab and click Save at the top of the page.
- Click Launch to manually launch Device Discovery. This process will take several minutes and is complete when the resource identified on the Notifications tab receives a notification email.
- Only then proceed to the next step.
Step 5: Run the Device Discovery Wizard
- Go to CRM > Launch Discovery Wizard > Kaseya.
- Complete all steps of the wizard. If you followed the setup steps above, no changes are required.
Step 6: Create a Kaseya Mailbox in Incoming Email Processing
- Go to Left Navigation Menu > Admin > Admin Categories > Features & Settings > Application-Wide (Shared) Features > Incoming Email Processing.
- Click New. Configure your custom mailbox with Kaseya Alert Handling enabled.
Step 7: Configure Duplicate Ticket Handling
- Go to Left Navigation Menu > Admin > Admin Categories > Features & Settings > Application-Wide (Shared) Features > System Settings.
- Scroll down to the Service Desk section: Duplicate Ticket Handling (Add Ticket E-Mail Service and Autotask Web Services).
- Click [click here to edit] to access the Duplicate Ticket Handling window and set:
- Duplicate Ticket Definition: Check the three boxes for "Any ticket with the same...": ticket number as an existing ticket; alert ID as an existing ticket; and external ticket ID as an existing ticket.
- Duplicate Ticket Action: Select "Attach the matching ticket as a note to the existing ticket", then check the box for "If the existing ticket has a status other than "Complete" change its status to": Note Added.
For more information on duplicate-ticket handling, refer to Configure the Duplicate Ticket Handling system setting.
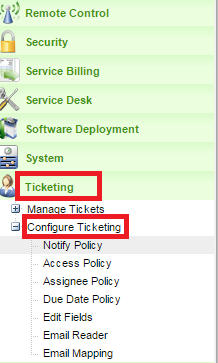
Step 8a: Kaseya Service Desk users only: Configure Kaseya to forward alerts to Autotask
In order to forward Kaseya Service Desk alerts to Autotask for ticket creation, you must provide an email template and set up the forwarding procedure in Kaseya.
Add email template
- Access Service Desk from the Kaseya left pane menu.
- In the Service Desk menu click Templates > Message Templates.
- Complete the template form.
| Field | Description |
|---|---|
| ID: | Autotask Email Template |
| Description: | Autotask Email Template |
| Subject: | [$Summary$] |
| To: | Enter the mailbox email address of the Kaseya mailbox configured in Incoming Email Processing in Step 6. |
| From: | [=Email_KaseyaServer=] |
| Body: | [Ticket Notes ~ticRefld='[TicketId$]'] Ticket ID: [$TicketId$] Machine ID: [$FullMachineName$] Log in and view ticket: [$TicketURL$] ---------------------------------------- Author: [$SubmitterName$] Date: [$CreateDateTime$] [$Description$] ---------------------------------------- |
Set up procedure to forward Service Desk alerts
- Return to the Kaseya Service Desk left pane menu. Under Procedures Definition, click Stage Entry or Exit.
- In the right pane, click the SD Procedure that matches your definition template in your Service Desk Configuration; for example, Customer_SD_Automation > CS Incident enters New Ticket.
- When your SD procedure is highlighted, click the Pencil icon at the top of the page to edit the procedure.
- Click New Step at the top of the page and then select "Send Email" from the Set Type menu.
- Select "Autotask Email Template" from the Select Message Template menu.
- Under Step Options, enter the mailbox email address of the Kaseya mailbox configured in Incoming Email Processing into the To: field
- Scroll to the bottom of the procedure properties and check Continue on fail.
- Click Save & Close.
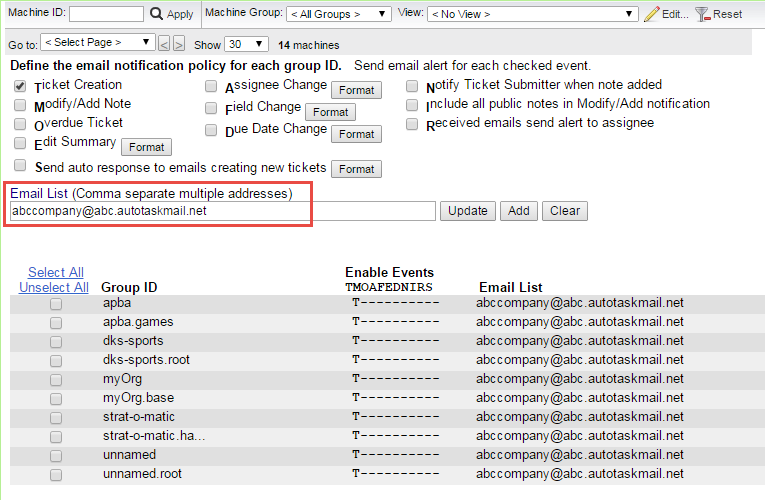
Step 8b: Kaseya Ticketing users only: Configure a Ticketing "Notify Policy"
If you are not using Kaseya Service Desk, but use the Ticketing process instead, Autotask tickets are created from Kaseya email notifications sent to the Kaseya mailbox in Autotask Incoming Email Processing.
For detailed instructions on configuring Ticketing, refer to the Kaseya Online Help. Pay special attention to the Notify Policy section, where you determine what events generate an alert, and the email address it is sent to.