Troubleshooting guide for Microsoft Azure Active Directory sync failures
Topic
This article describes how to troubleshoot Active Directory synchronization failures between Autotask and Microsoft Azure.
Description
There are several reasons why sync may fail in Azure. You will know sync has failed when the Status column on Active Directory (AD) Sync page displays a red X rather than a green dot. 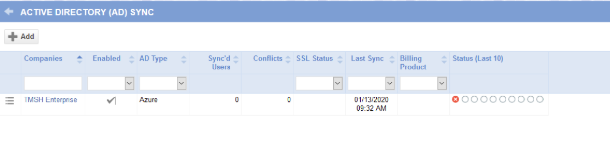
You can resolve most synchronization failures by following the steps below.
- You need to link each organization in the Azure setup in Autotask to its group in Azure. Additionally, each group needs to have a group type of either Security or Microsoft. There may be other group types that will work; however, these are the two types we know will work. Make sure the group type is one of these two options.
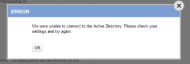
- Verify that the Client ID, Tenant, and Group ID, as well as the Client Secret, are correct. The Group ID should be specific to your local organization's group in Azure. If you have verified these items and the sync is still failing, delete the Client Secret from Azure and generate a new one. Then replace the Client Secret in Autotask. Save the configuration and select Test Connection. If you receive an error message stating there was a problem connecting to the Active Directory, move on to the next steps.
- Navigate to the Notifications tab of your local organization's Azure setup in Autotask. In the Other emails section, add your email address and click Save. Then from the context menu, select Force Sync. Autotask will email an error message to the email you entered in the notifications tab. Check that error message.
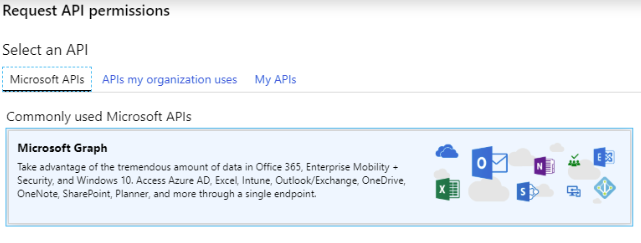
- The most common error message received is: "The remote server returned an error: (403) Forbidden." This error is typically caused by incorrect API settings in Azure. Follow the steps below to ensure proper settings.

- In the app menu, click Manage > API permissions. The Your App Name - API permissions page will open.
- Click Add a permission. On the Request API permissions page, click Microsoft Graph.
- Click Application permissions and expand Directory. Check Directory.Read.All and Directory.ReadWrite.All.
- Click Add permission. The permission is added but appears as Not granted.
- Scroll to the Grant consent section and click Grant admin consent for [your local organization name]. If the permission still appears as Not granted, log out and back in to refresh the settings.
-
Attempt to force synchronization again.
If the synchronization still fails, contact Kaseya Helpdesk. A screenshot of the error and a list of your Azure group settings can help in troubleshooting the issue.


